----- Needs PC 2.x update----
Caldera PrimeCenter is a prepress software solution.
Using Caldera PrimeCenter products, you can create layouts and export them as a PDF file format. The exported file (.pdf) is compatible with CalderaRIP software (v13.1) and any other RIP software.
Caldera PrimeCenter v1.0.1 software, adds cutter registration marks around each created layout. The exported CUT file (.zcc) is only compatible with Zund Cut Center controller (v2.7)
But you can create a layout without any registration marks. The generated/exported PDF file will contain and preserve all the « CutContour » information.
For what purpose?
- To use Caldera PrimeCenter « nesting » features and its fully automated workflow to generate PDF files compatible with different RIP software
- To add cutter registration marks from another software
- To use CalderaRIP’s CutServer or GrandCutServer options to add cutter registration marks
- To be compatible with all Caldera supported cutter drivers
How to proceed?
Pre requirements:
- You need to use a PDF file that includes a CutContour.
- Your CalderaRIP software needs to be configured with a Caldera Print driver and a Cutter driver.
- To install and configure a Printer and a Cutter driver, please refer to our Caldera dedicated documentation.
- You will need a CalderaRIP license compatible with Caldera CutServer or Caldera Grand CutServer options to allow the generation of cut files.
- You will need a Caldera PrimeCenter BASIC, PRO, or MAX license to be able to generate PDF files.
In the CalderaRIP software:
- Configure the Print module
- Check the space used by the « Cutting contour » feature
The space left will help us configure new formats (Rolls or Sheets) in Caldera PrimeCenter software.
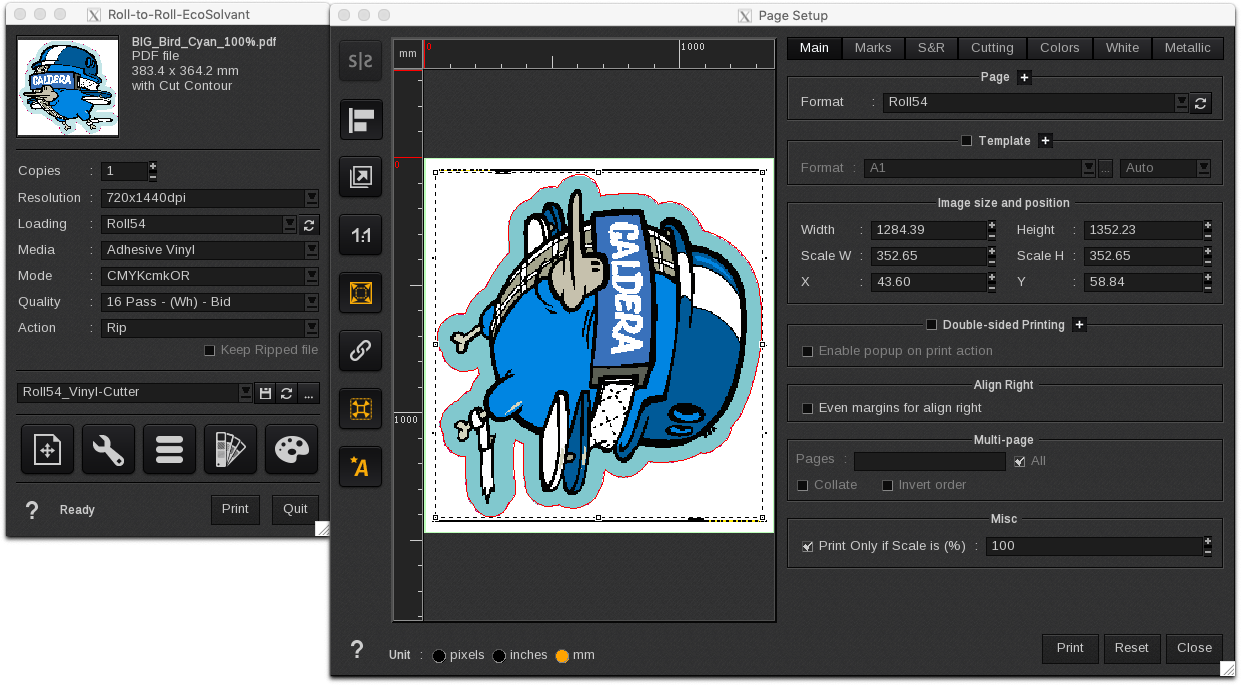
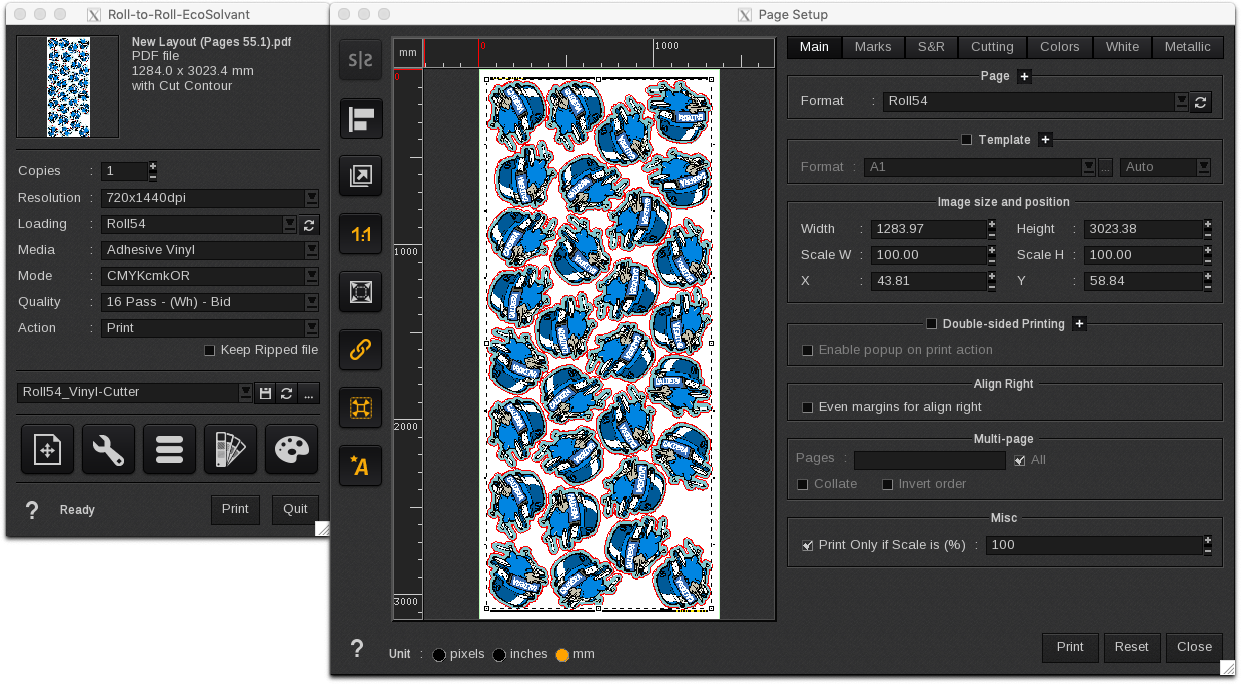
Configure the Print module: Example with a Roll54
- Import a PDF file using Fileman module
- Drag & drop a PDF file available in the Caldera ImageBar into one of your Caldera Print modules
- In the Print module > Main interface, select the print parameters:
- Resolution
- Loading dimensions (Example: Roll54)
- Mode
- Media type
- Quality…
- In the Print module > Image positioning… (Page Setup) enable:
- The « Printing scale 1:1» icon
- The « Center the image on page » icon
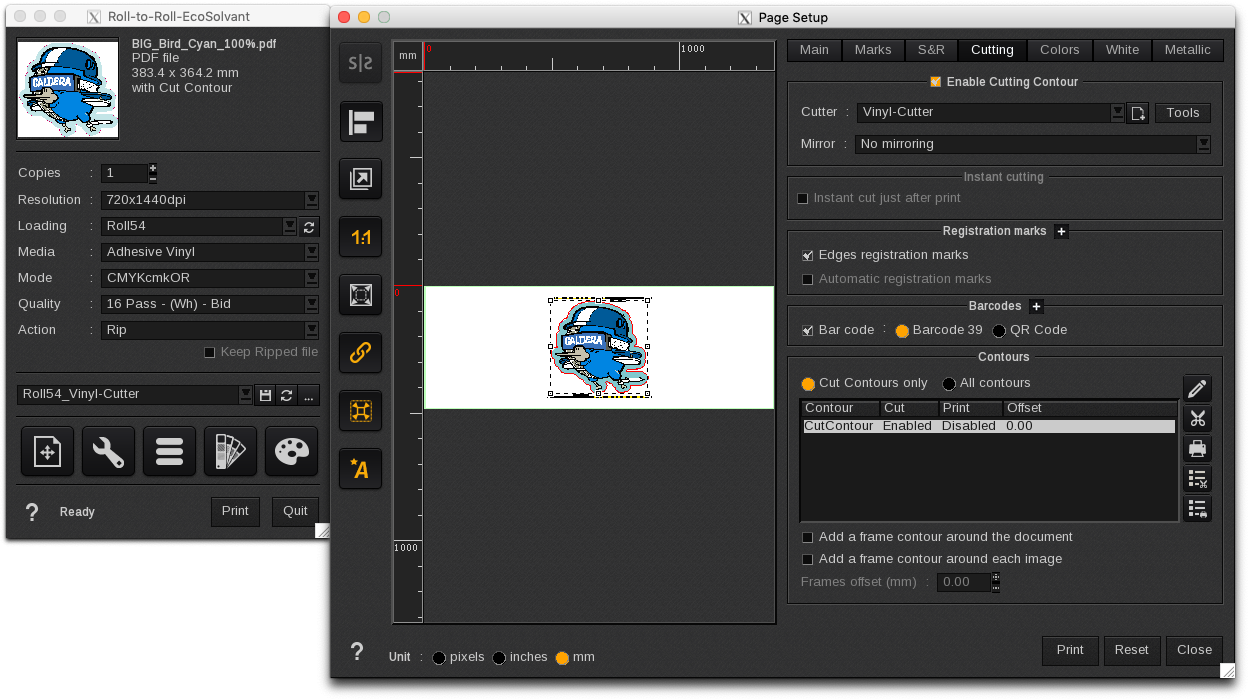
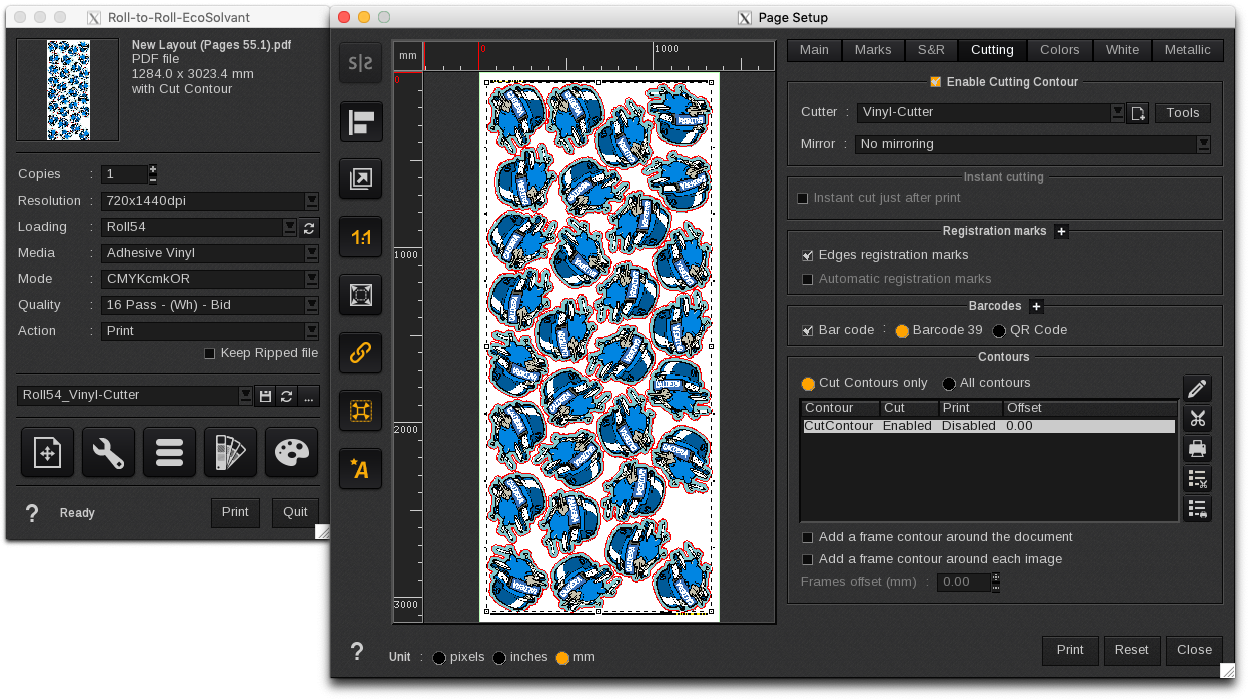
- In the Print module > Image positioning… icon > Cutting tab, enable:
- Cutting Contour
- Choose a cutter model in the list (Example: Vinyl-Cutter)
- Configure its « Tools »
- Setup the Marks and margins
- Save the margins parameters as an XML file format
- Apply the settings and click on OK to come back to the Cutting tab
- Configure the Registration marks
- Configure the Barcodes
- Configure the Contours
- Close the page setup
- In the Print module > Main interface, « Save » the print configuration with the following name (Example: Roll54_Vinyl-Cutter)
Configure the Print module: Example with a sheet/board
- Import a PDF file using Fileman module
- Drag & drop a PDF file available in the Caldera ImageBar into one of your Caldera Print modules
- In the Print module > Main interface, select the print parameters:
- Resolution
- Loading dimensions (Example: 1250x2500mm)
- Mode
- Media type
- Quality…
- In the Print module > Image positioning… (Page Setup) enable:
- The « Printing scale 1:1» icon
- The « Center the image on page » icon
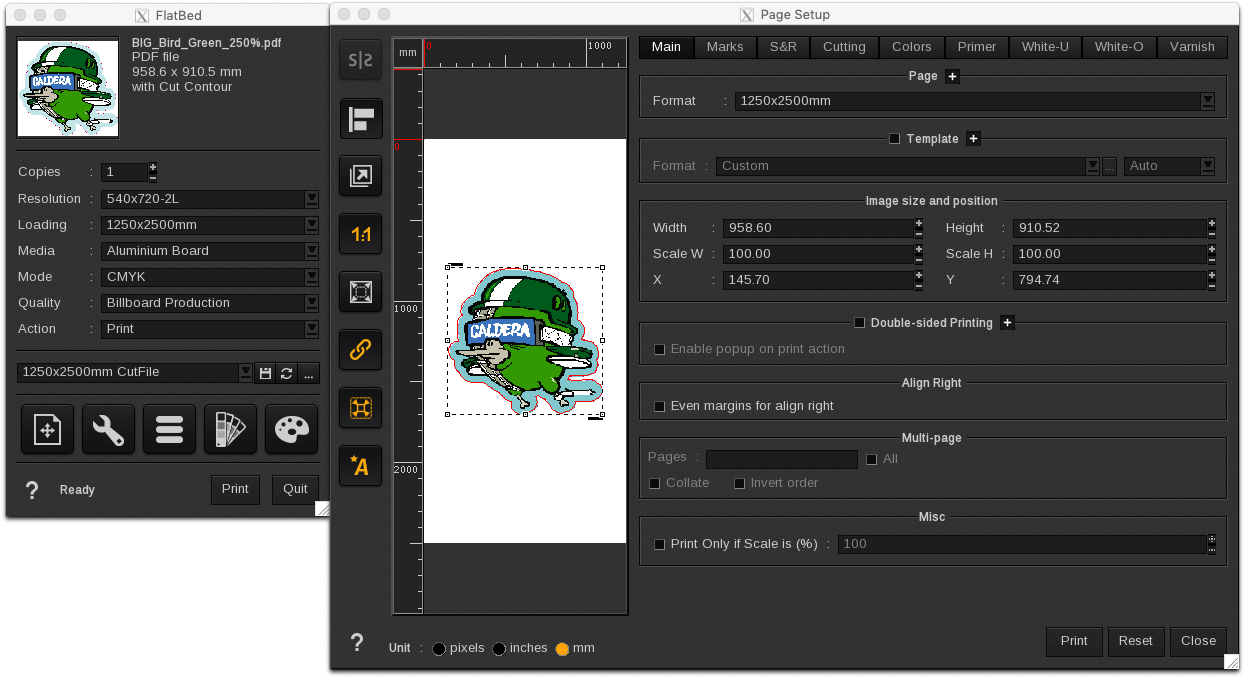
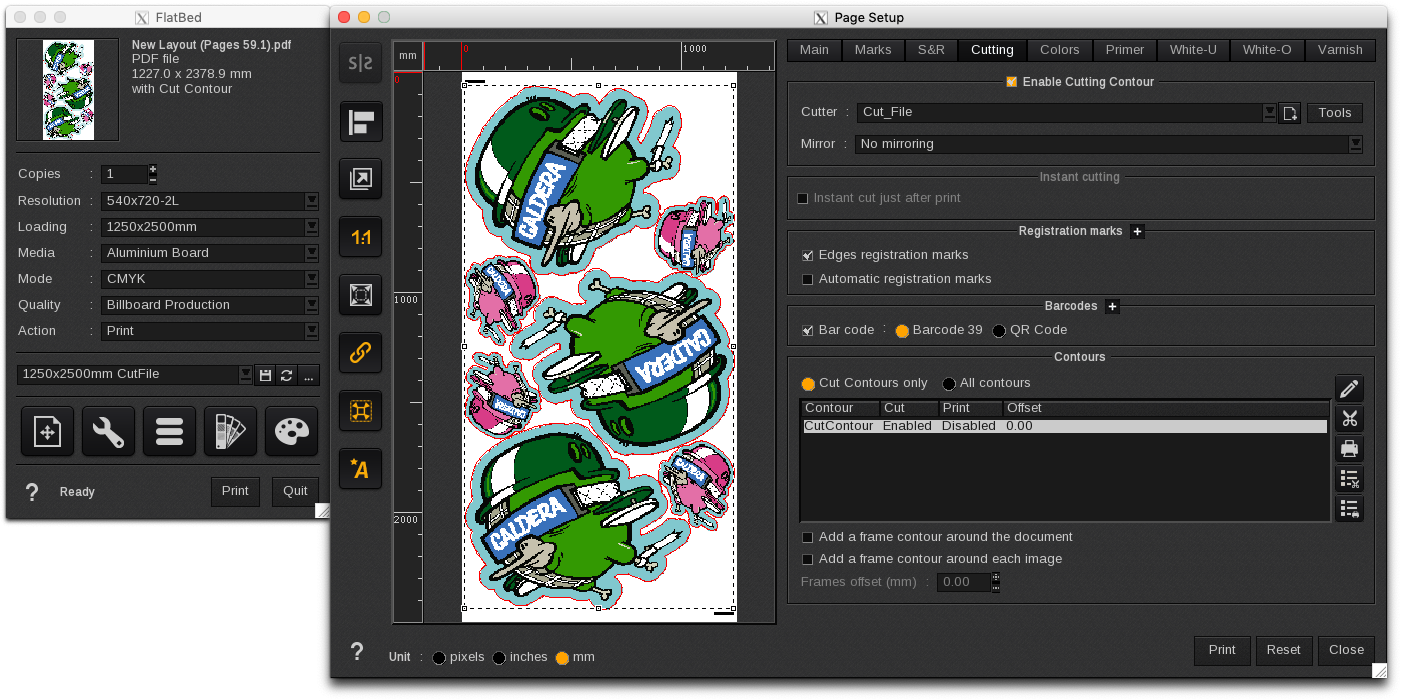
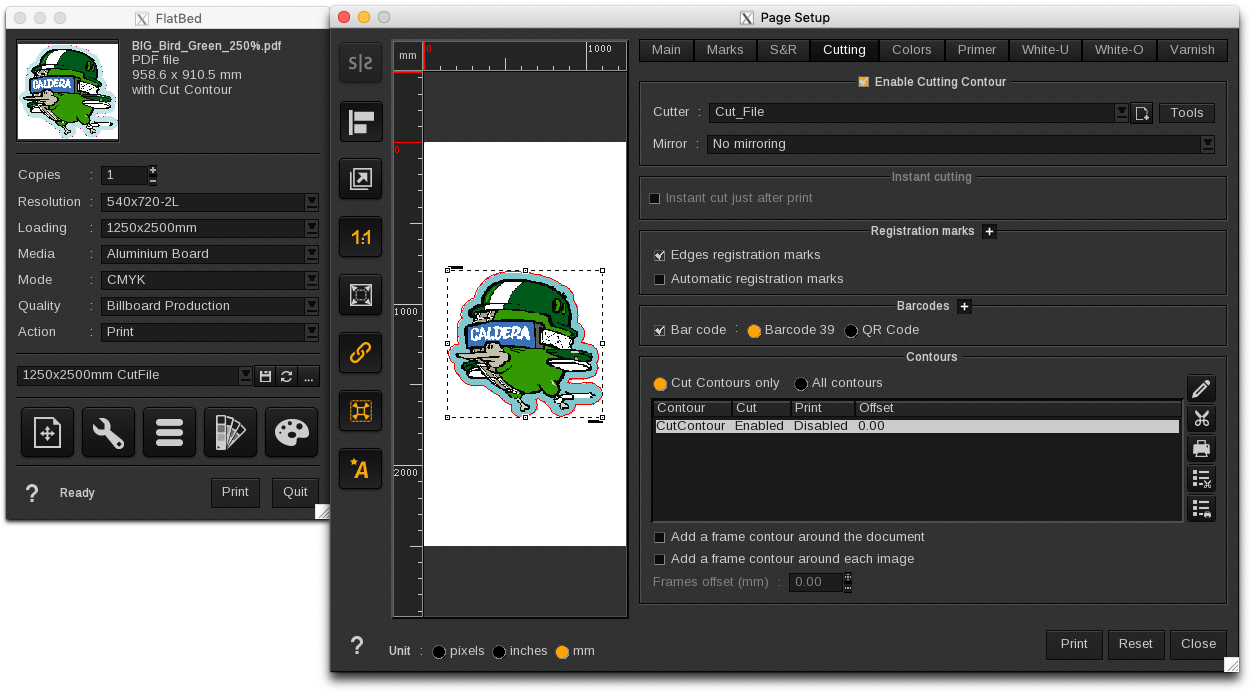
- In the Print module > Image positioning… icon > Cutting tab, enable:
- Cutting Contour
- Choose a cutter model in the list (Example: Cut-File)
- Configure its « Tools »
- Setup the Marks and margins
- Save the margins parameters as an XML file format
- Apply the settings and click on OK to come back to the Cutting tab
- Configure the Registration marks
- Configure the Barcodes
- Configure the Contours
- Close the page setup
- In the Print module > Main interface, « Save » the print configuration with the following name (Example: 1250x2500mm_CutFile)
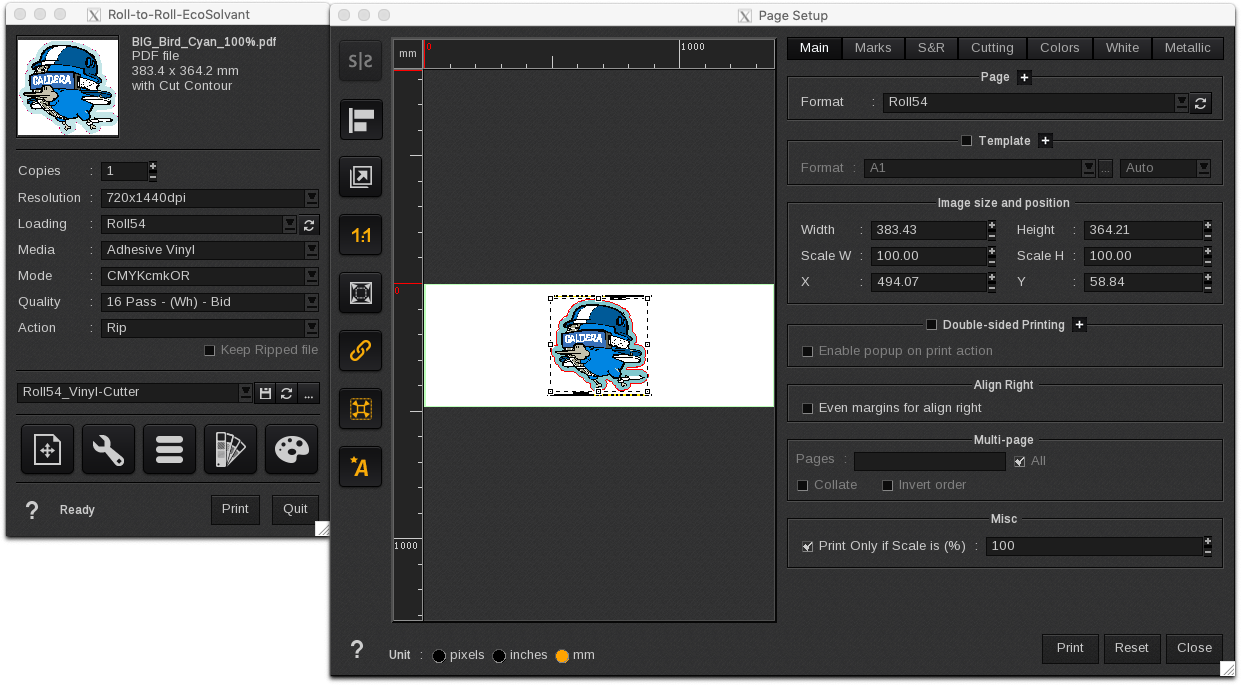
Check the space used by the « Cutting contour » feature (Roll mode)
- Drag & drop a PDF file available in the Caldera ImageBar into one of your Caldera Print modules
- In the Print module > Main interface, select a print configuration in the list
- (Example: Roll54_Vinyl-Cutter)
- In the Print module > Image positioning… (Page Setup), the Main tab:
- Enable the « Prints in full scale » icon
- Check that the Format in the « Page » menu (Example: Roll54) is selected
- In « Image size and position» check the image « Width » (The value = 1284 mm)
- In this example, the image width, equal the maximum format width (Roll mode) that can be created and used in Caldera PrimeCenter = 1284 mm
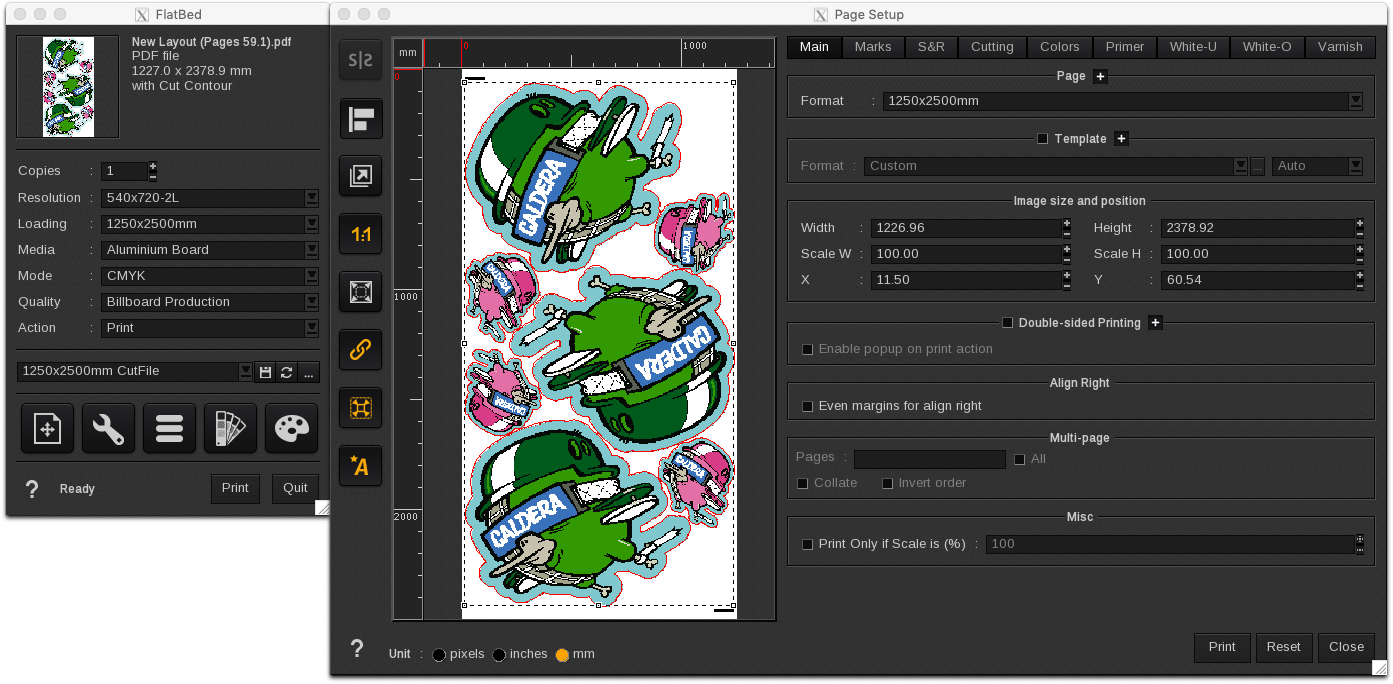
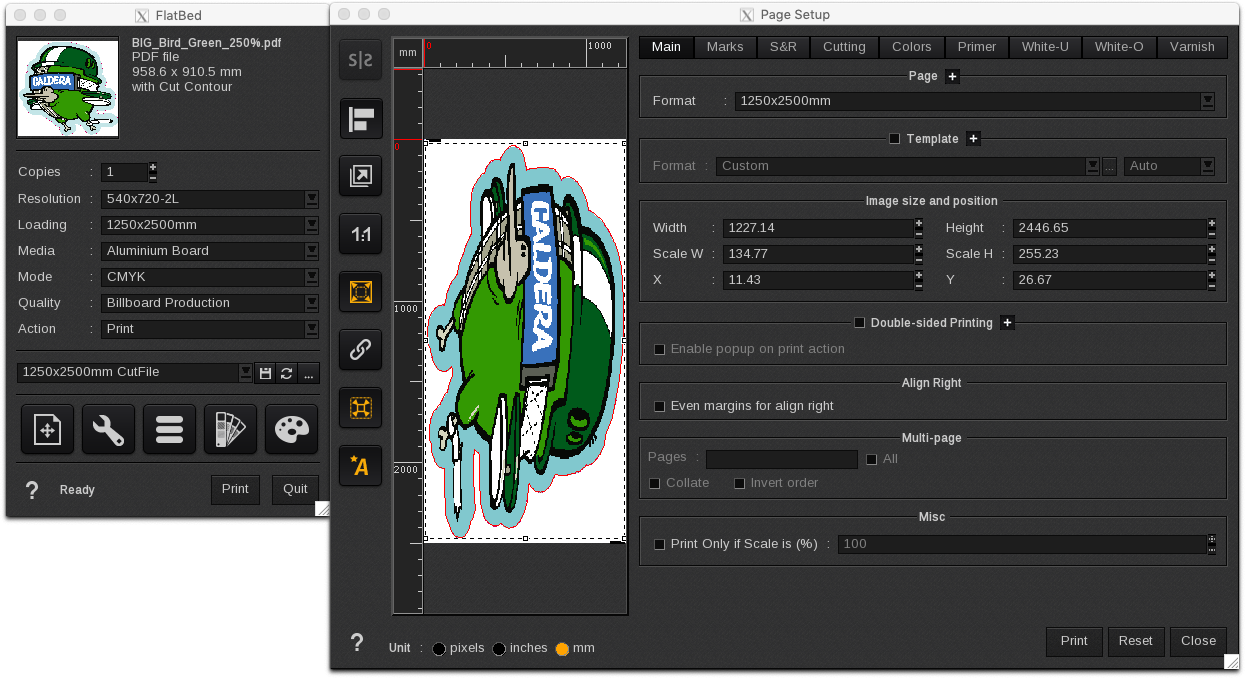
Check the space used by the « Cutting contour » feature (Sheet/board mode)
- Drag & drop a PDF file available in the Caldera ImageBar into one of your Caldera Print modules
- In the Print module > Main interface, select a print configuration in the list
- (Example: 1250x2500mm)
- In the Print module > Image positioning… (Page Setup), the Main tab:
- Disable the « Keep ratio » icon
- Enable the « Prints in full scale » icon
- Check that the Format in the « Page » menu (Example: 1250x2500mm) is selected
- In « Image size and position » check the image « Width » and « Height » values
- In this example, the image width and height, equal the maximum format (Sheet/board mode) that can be created and used in Caldera PrimeCenter =1227x2446 mm
In Caldera’s PrimeCenter software:
- Create a new Format compatible with CalderaRIP print configuration: Roll54_Vinyl-Cutter
- Create a recipe and Apply manual layout
- Export the layout as a PDF file to CalderaRIP software
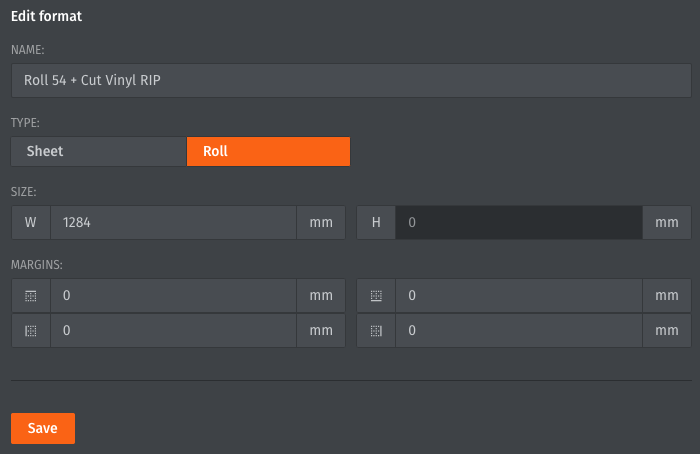
Create a new Format compatible with CalderaRIP print configuration: Roll 54 + Cut Vinyl RIP
- In Caldera PrimeCenter, select the Edit menu > Settings…
- In Settings, select Format and right-click on the icon close to Formats list, to Create a new Format
- Edit the Format with the following parameters:
- Name: Roll 54 + Cut Vinyl RIP
- Type: Roll
- Size Width: 1284 mm
- Save the new Format
Create a recipe and apply manual layout
- Create a recipe:
- Click on the « + » icon available in the Recipes area to create an original recipe
- Right-click on the new tab and choose « Rename »
- Fill in the following name: « Roll 54 + Cut Vinyl RIP »
- Configure the recipe:
- In Page Tab
- Select a MEDIA (Example : Adhesive Vinyl)
- Select a FORMAT (Example : Roll 54 + Cut Vinyl RIP)
- In Cutting module
- Disable « Get Estimated Cutting Time »
- Disable « Add cut marks »
- Disable « Cutter output »
- In Page Tab

- Open a new image:
- In File Manager
- Click on « Open »
- Select the cyan image and click open
- In File Manager
- Insert an image into the Studio:
- In File Manager
- Select the image preview
- In Properties
- Select 30 copies
- Click on « Insert »
- In File Manager
- Apply the recipe:
- In the Export module
- Choose the PDF options
- Click on « Apply » to start the nesting and optimization process
- In the Export module
- Export the layout as a PDF file pre-configured for CalderaRIP software
- In the Layout area
- Select the new optimized layout
- Click on « Export » to create a PDF file
- Choose the destination folder and save the PDF file
- In the Layout area
- The PDF file can now be loaded in CalderaRIP software.
- You will be able to print the file scale 1:1 on a Roll 54 and to use our Vinyl-Cutter driver
- Create a new Format compatible with CalderaRIP print configuration: 1250x2500mm + Cut File RIP
- Create a recipe and Apply manual layout
- Export the layout as a PDF file to CalderaRIP software
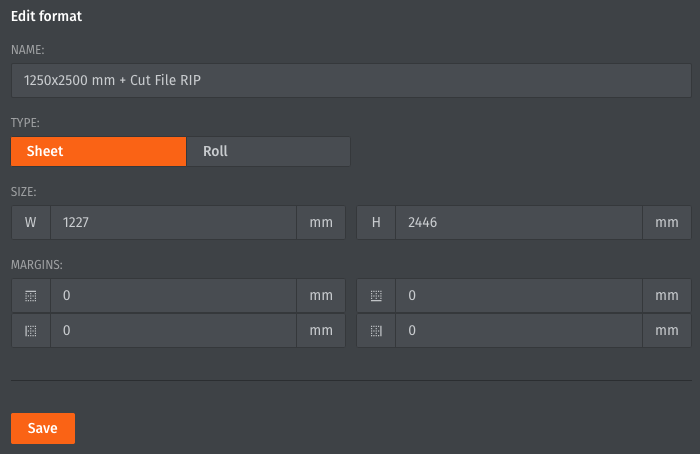
Create a new Format compatible with CalderaRIP print configuration: 1250x2500mm + Cut File RIP
- In Caldera PrimeCenter, select the Edit menu > Settings…
- In Settings, select Format and right-click on the icon close to Formats list, to Create a new Format
- Edit the Format with the following parameters:
- Name: 1250x2500mm + Cut File RIP
- Type: Sheet
- Size Width and Height: 1227x2446 mm
- Save the new Format
Create a recipe and apply manual layout
- Create a recipe:
- Click on the « + » icon available in the Recipes area to create an original recipe
- Right-click on the new tab and choose « Rename »
- Fill in the following name: « 1250x2500mm + Cut File RIP »
- Configure the recipe:
- In Page Tab
- Select a MEDIA
- Select a FORMAT (Example : 1250x2500mm + Cut File RIP)
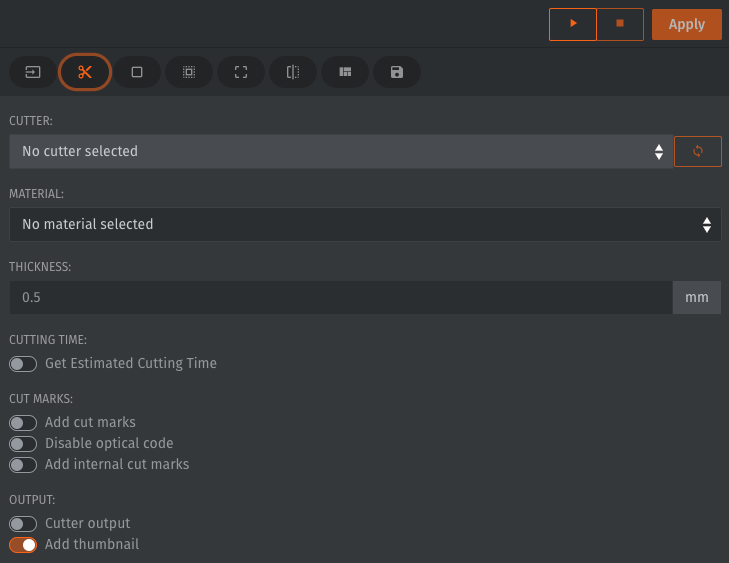
- In Cutting module
- Disable « Get Estimated Cutting Time »
- Disable « Add cut marks »
- Disable « Cutter output »
- In Page Tab
- Open a new image:
- In File Manager
- Click on « Open »
- Select the green image and click open
- Click on « Open »
- Select the pink image and click open
- In File Manager
- Insert an image into the Studio:
- In File Manager
- Select the green image preview
- In Properties
- Select 6 copies of the green file
- Click on « Insert »
- In File Manager
- Select the pink image preview
- In Properties
- Select 8 copies of the pink file
- Click on « Insert »
- In File Manager
- Apply the recipe:
- In the Export module
- Choose the PDF options
- Click on « Apply » to start the nesting and optimization process
- In the Export module
- Export the layout as a PDF file pre-configured for CalderaRIP software
- In the Layout area
- Select the new optimized layout
- Click on « Export » to create a PDF file
- Choose the destination folder and save the PDF file
- In the Layout area
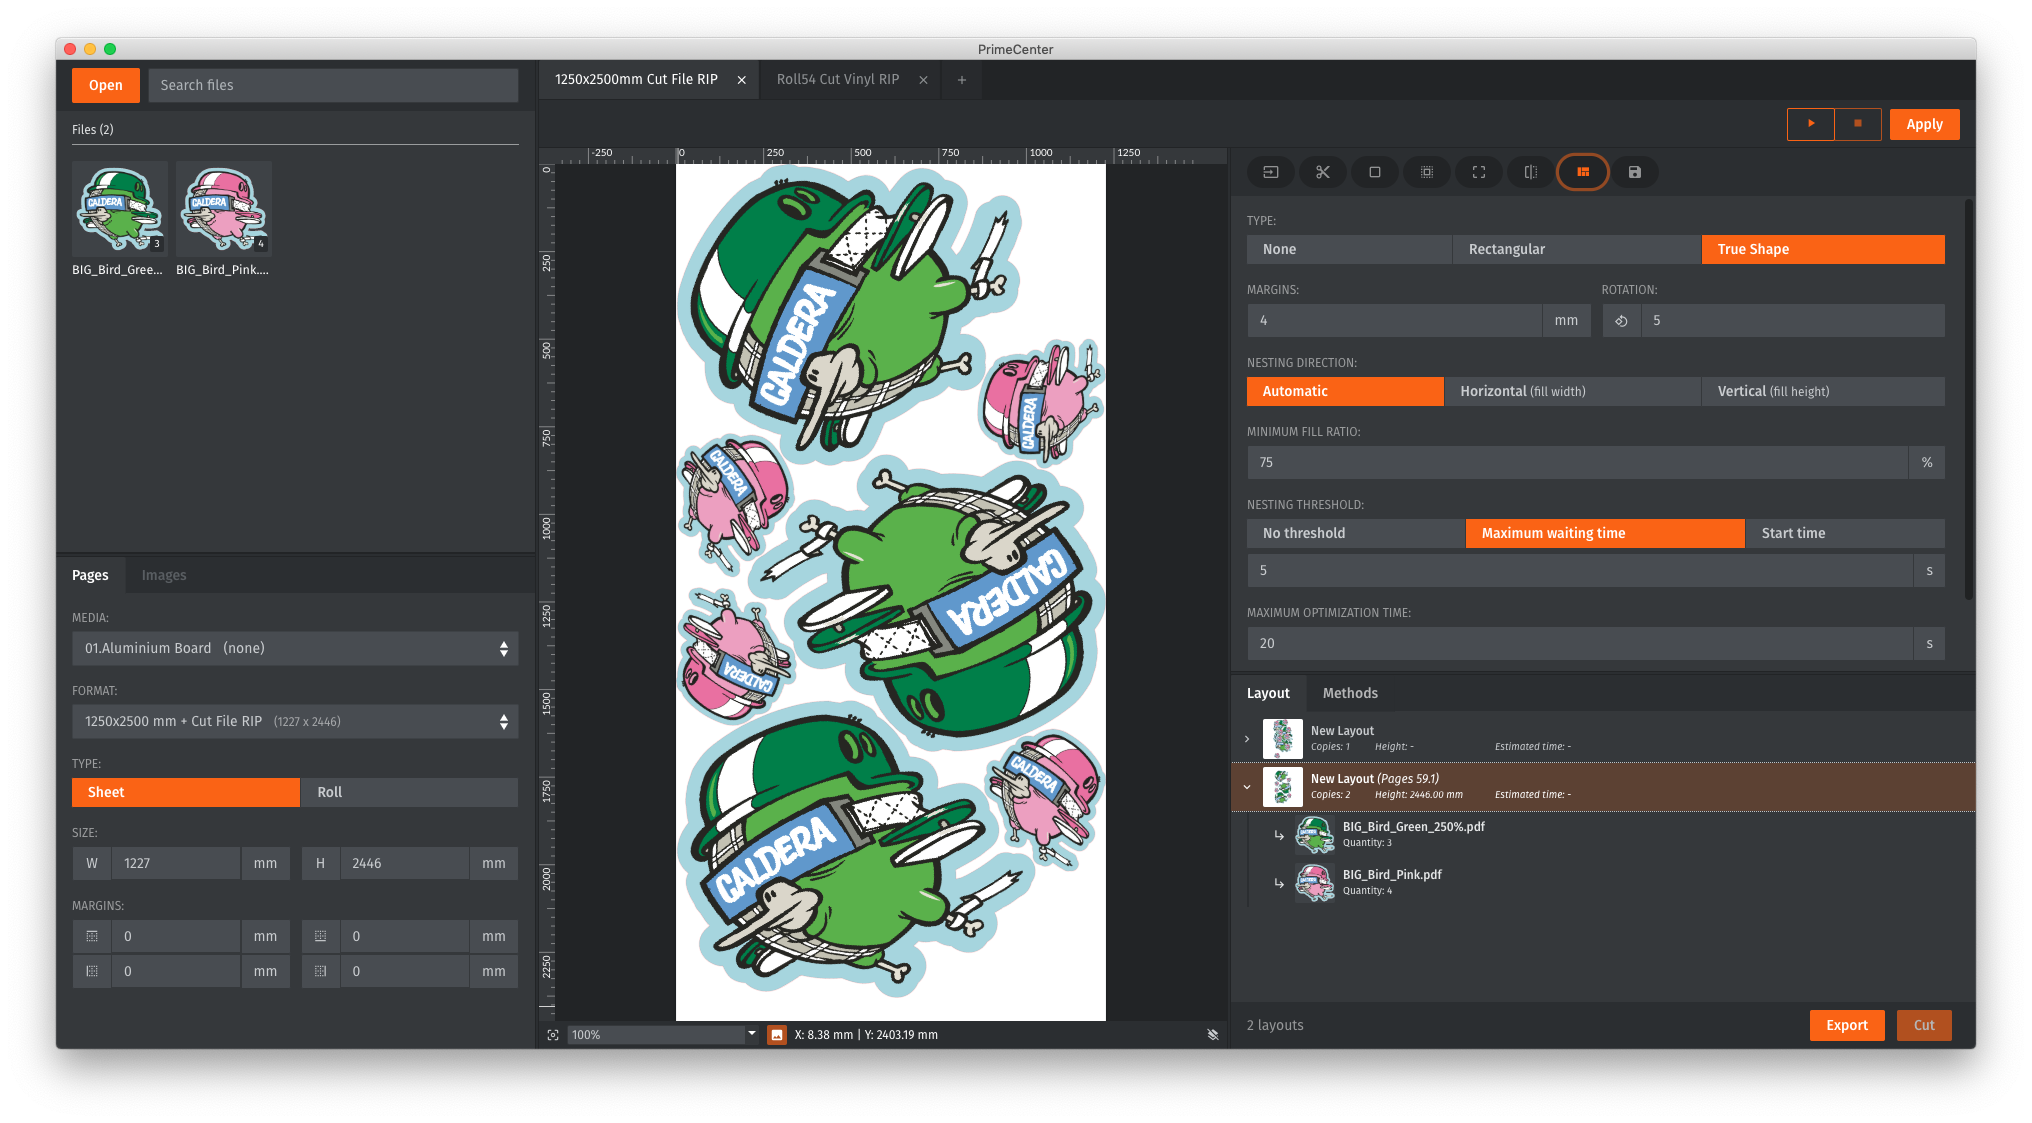
- The PDF file can now be loaded in CalderaRIP software.
- You will be able to print the file scale 1:1 on a Sheet/board and to use our Cut-File driver.