Printer
- Scan width: You can choose between Printer or Job.
- Cut media: Enable or disable this function by checking or unchecking the box.
- Top Blower strength: By checking the box, you enable the top blower strength and you will be able to select Off, Low, or Special.
Only with 8C drivers:
- Under layer: You can select one of the following options: None, Color, or Special.
- Top layer: You can select one of the following options: None, Color, or Special.
In the Printer Parameters (wrench icon) available from the module, choose the inks you want to apply as the Under layer and the Top layer.
Combinations available:
|
Under Layer |
None |
None |
Color |
Color |
Special |
Special |
|
Top Layer |
Color |
Special |
None |
Special |
None |
Color |
If you set one of the layers as None, there is no difference, if None is applied to the under or the top layer: None + Color will print exactly the same as Color + None.
If you select None, for both layers, you will get an error message while clicking on the Print button to inform you that the print is not possible with this layer configuration.
If you select Color or Special for both layers, only one will be printed.
Only with (C)JV300 drivers:
-
Printhead used: this function let you choose between multiple printhead parameters:
- Head 1: will use only the set of print Head 1
- Head 2: will use only the set of print Head 2
- Both heads: will use print Head 1 and print Head 2 simultaneously (recommended parameter)
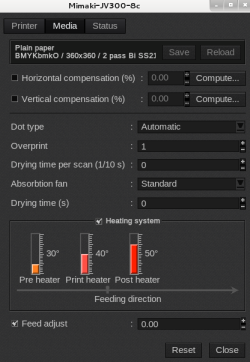
Media
 .
. 
- Information: at the top of the window, you are able to see information about your media. There you have access to two actions:
- Save: when you click on this button, the current media settings are saved to the selected media profile (printer, media, resolution, mode) so there will be applied for any new job using the same print configuration. If you don't save, the changes you made are only applied to the current job.
- Reload: will revert back to default as set during profiling or the last saved changes.
- Horizontal compensation (%): we recommend not modifying this. Any deviation is likely to be mechanical on the printer's side.
- Vertical compensation (%): this can be useful if you detect an increase or decrease in the length due to heating or media tension which is common when printing on vinyl or textiles for example. To calculate the compensation, click Compute and follow the software’s instructions.
- Dot type: You can choose Automatic, Large, medium, or small.
- Overprint: Type the number wanted or use the + and - buttons.
- Drying time per scan: Type the number wanted or use the + and - buttons. Duration is measured in 1/10 second.
- Absorption fan: Here, you can select one of the following options Off, Weak, Standard, or Strong.
- Drying time: Type the number wanted or use the + and - buttons. Duration is measured in seconds.
- Heating system: You can adjust the temperature of the Preheater, Print Heater, and Poster Heater (in Celsius degrees) by clicking inside the thermometer.
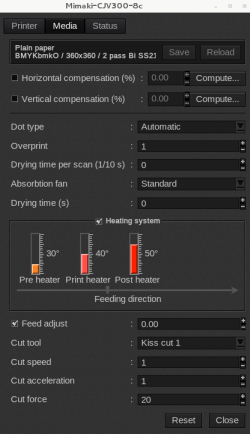
- Feed adjust: You can enable or disable this function by checking or unchecking the box. Type the number wanted or use the + and - buttons.
- Cut tool: Choose the cut tool you want to use.
- Cut speed: Type the number wanted or use the + and - buttons.
- Cut acceleration: Type the number wanted or use the + and - buttons.
- Cut force: Type the number wanted or use the + and - buttons.
Status
- Inks: Information about Inks levels
- Heaters: temperature level of the Preheater, the Print heater, and the Post heater.
- Media: Information about the media loaded on the printer
- Misc: Complementary info about the printer (model, serial number, firmware version)
- Refresh: The button to refresh the tab.