How to set the grommets from the Print module?
Note: grommets cannot be used with
Grommets activation
To activate grommets, please follow this process:
- Open the Print module and add your image.
- Open Page Setup.
- Go to the Marks tab.
- Activate the Grommets using the checkbox.
- You can see the grommets in the preview. You can zoom in on the grommets to see them closer.
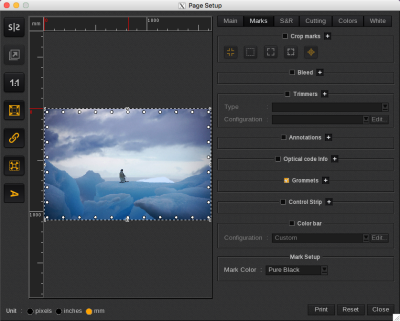
Grommets settings
Open settings
To set the grommets, you first need to open the grommets section by clicking on the +.
Then click on the Edit button to change the grommets parameters.

Set the grommets accordingly. These fields are similar to those found in the Tiling+ module.
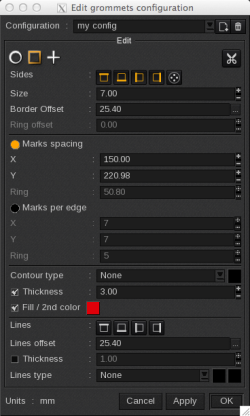
Edit Grommets Configuration Window
The Edit Grommets Configuration window allows you to define the parameters of your grommets.
Shape and position
Grommet mark options are listed below:
Note: When you make a selection for grommet marks, your selection applies to all the grommet marks unless otherwise specified.
- Shape: select from circle, square and cross:
- Cut contour when enabled a cut contour line is embedded in the shape of the grommet selected above. The contour outline and fill is no longer printed (if applicable).
- Sides where grommets will be added. The last button adds an ellipse on which grommets will be placed.
- Size: defines the diameter for round grommets, and the length for either square or cross grommets
- Border Offset: defines the distance between center of the grommets and the image border. For example, a Border Offset equal to zero will align the center of the grommet to the image border. The […] button opens the following window to define the specific offset of each side.
- Ring offset: adds additional distance between the ellipse and the other grommets.


The size is indicated in the module’s unit.
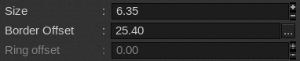
Margins are included in the global size of the poster so if the offset is smaller than the margin size, the center of the grommet will be in the margin.
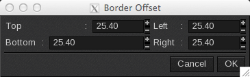
Values are then reported in the grommets window in this order: top, bottom, left then right.
Number of grommets
There are two options available for placing grommets on a graphic. The options are mutually exclusive so they cannot be used at the same time
- Marks spacing: defines the maximum distance between the center of the grommets on the X and Y axis. Grommets will dynamically appear based on the information entered in the X and Y fields. You cannot create a distance longer than the image size. Ring applies only to the grommets placed in the shape of an ellipse and defines the maximum distance between those grommets.
- Marks per edge: places the number of grommets you specify in the X and Y fields and makes each grommet equidistant from one another.
Note: The minimum selection is 2 on each axis and 4 on the ellipse.
Grommets contour
You can assign an outline and a fill to circle and square grommets:
Note: When the cut contour is enabled, the outline and fill will not be printed even though they will appear in the preview window.
- Contour type: lists options for the contour outline
- None: no contour line is applied to the grommets
- Plain: a solid line is applied to the grommets
- Dashed: a dotted line is applied to the grommets
- Choose the color of the contour by clicking on the square at the end of the contour type line (the square is black by default).
- Thickness: defines the thickness of the contour line by entering a value into this field.
- Fill/2nd color: assign a fill color to Squares and Circles. By default, only the contour line of the shape is printed, the inside remains transparent. You can assign a color to fill the shape by clicking on the colored square. The fill color will appear on the printed graphic.
Add Lines
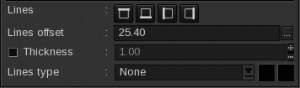
- Lines: select which sides of the graphic to apply the lines.
- Line offset: defines the distance between the line and the image border. For example, a line offset equal to zero will align the line to the image border. Click the […] button to define the specific offset of each side.
- Thickness: defines the thickness of the line by entering a value into this field.
- Line type: You can assign a line type from the options below:
- None: no line is applied
- Plain: a solid line is applied
- Dashed: a dotted line is applied
If you put a negative value, it will be ignored. The line must be inside the image or on the border of it.
If you choose a dashed line, you can select a second color for the line’s perimeter. Note, in the preview you will only see the first color you selected. However the second color will be printed correctly.
Preview
The Page Setup preview will refresh automatically when you click Apply at the bottom of the configuration window. You are then able to see the changes without exiting the window.
Error
Overlapping grommets are not supported. If you define a value (e.g. size, spacing or number of grommets) that results in an overlap, the grommets header will blink red. If this occurs, you must review your parameters before sending the job to print.

Save the configuration
You can save the grommets configurations to easily select and use.
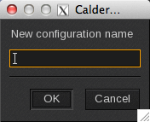
Add a configuration
To create a new configuration click on the new button.

Type in the configuration’s name and click OK.
Then set the parameters and click OK to save the new grommet configuration. It is automatically applied and added to the grommets configuration list.
Edit a configuration
To edit a configuration, select it from the list then click the Edit button.
The Edit grommets configuration window opens. Change the settings and then:
- Click on OK to save your changes and to exit the Edit grommets configuration window. This option applies the configuration listed in Configuration field to your print job.
- Click on Apply if you want to continue to work within the Edit grommets configuration window.
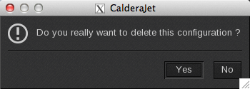
Delete a configuration
There are two options for deleting a configuration:
- Select the configuration from the list and click on the Trashcan icon.
- Open the Edit grommets configuration window by clicking on Edit. Then select the configuration from the list and click on the Trashcan icon.


In either case, you will be prompted to confirm you want to delete the configuration. Click Yes to confirm.
You cannot delete the « Custom» configuration, you may only change its parameters.