How to use PrintBleed?
Introduction
What’s PrintBleed?
PrintBleed is a feature located in the Print module and it is activated in the Marks tab.
PrintBleed manages bleed areas. This feature adds pixels around the image contour or border. It can be used for cutting purpose to ensure that the cut will be done inside the printed area and also for canvas for example, to cover the edge of the frame.
Bleed area methods
Caldera RIP integrates three bleed area methods:
- Using background (Mask): we use the document's background to fill the additional layer. If there is no background, no pixel will be added to the print.
- Pixel duplication from the contour border (Duplicate): the color of the pixel located at the border of the image is used to fill the additional layer on the other side of the contour or border.
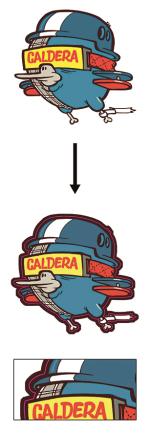
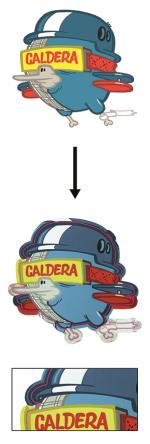
- Pixel duplication in mirror (Mirror): Symmetry is done using the contour as the axis of symmetry and to fill the pixels of the additional layer. It is used with gradients like the image below to avoid visual breaks between the image and its bleed area. You can compare it with the second method that uses only one color to fit the layer.
This method is only available with ContourNesting.
Example with a rectangular image (for canvas)
|
|
Duplicate method | Mirror method |

Example with a non-rectangular object (for cutting)
|
|
|
Mask method | Duplicate method | Mirror method |
PrintBleed for rectangular images
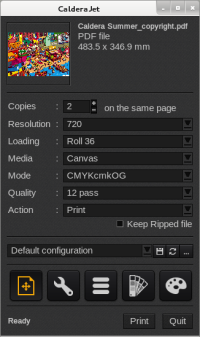
Follow these quick steps to use PrintBleed:
- Open the Print module.
- Add your image.
- Open the Page configuration.
- Go to the Marks tab.
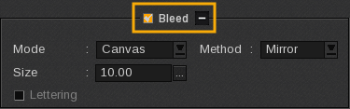
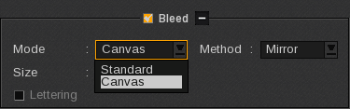
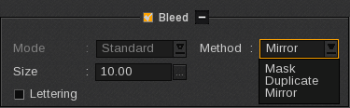
- Activate the Bleed and display all the settings by clicking the plus (+) which turns into a minus (-) to let you minimize back the settings.
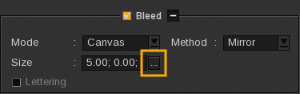
- Choose between Standard (the same value of bleed will be applied on all the image sides - Bleed in shown in purple on the preview) and Canvas (you will be able to select a different bleed value for each side - Bleed in shown in pink on the preview).
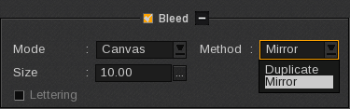
- Choose the Method to use between Mirror and Duplicate.
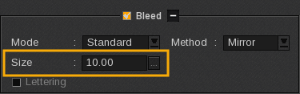
- Finally set the bleed Size. Accordingly to the Mode chosen, the size is set differently.
- StandardMode: the Size is applied on all the image sides.
- CanvasMode: use the [...] button to set specific Size for each side of the image.
- Then you can continue to set your print.

If you cannot choose the Mode, make sure that ContourNesting is not already activated (S&R tab, deactivate Step & Repeat or change the Step&Repeat type from Contour to Standard).
If you want to use both ContourNesting and PrintBleed, please refer to the next section.
The Mirror Bleeding for rectangular images is done using an orthogonal symmetry.
Please note that the bleed Size can be 100 mm maximum (3.94 inches).
If you use Step&Repeat, with PrintBleed in Standard Mode, the margin between the images will automatically be changed to twice the bleed Size if it was smaller. Be careful, if you reduce the bleed value, the margin between your images will not be changed, you will have to adjust it directly in the S&R tab.
View of a Standard PrintBleed, it is shown in purple in the Preview.
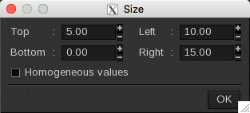
Enter the value of the Top, Bottom, Left and Right sides. Put 0 if you don't want to print bleed for a side. Activating the Homogeneous values option applies the Top value to all sides. If this option is activated, whatever value you change, it will be applied to the other sides automatically so they keep the same value.
View of a Canvas PrintBleed, you can see the custom sizes in pink in the Preview.
Important notes
Be careful, when PrintBleed is used with the ExtraMarks, you must make sure you set enough margins to place your cut marks otherwise they will be located in the bleeding area.
If you add other marks, indicate a Margin at least equal to your Bleed if you don't want the elements (marks, text, date...) to be printed in the Bleeding area.
PrintBleed will not cover Tiling
PrintBleed and ContourNesting
Follow these quick steps to use PrintBleed with ContourNesting:
Be careful, the image must have an embedded cut contour (for files created using the Compose module, the original images must have an embedded cut contour, Compose vectors are not taken into account by ContourNesting).
- Open the Print module.
- Add your image.
- Open the Page configuration.
- Go to the S&R tab, activate Step & RepeatContour and set it (Type, Number of Copies, Margins).
- Go to the Marks tab, activate the Bleed and set its Size. With ContourNesting activated, you cannot choose the Mode, it is automatically set to Standard.
- Finally, choose the Method to use between Mask, Duplicate and Mirror.
- Then you can continue to set your print.

Reminder, the cut is automatically activated when ContourNesting is.
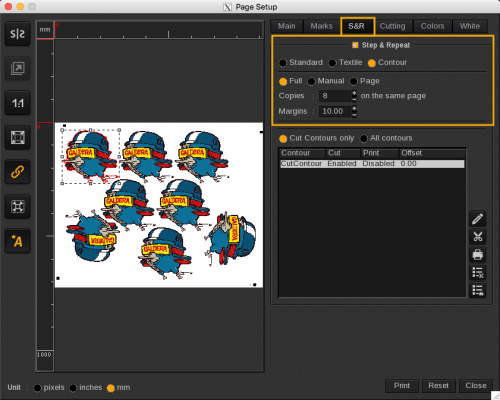
Please note that the bleed Size can be 10 mm maximum (0.39 inches) when used with ContourNesting.
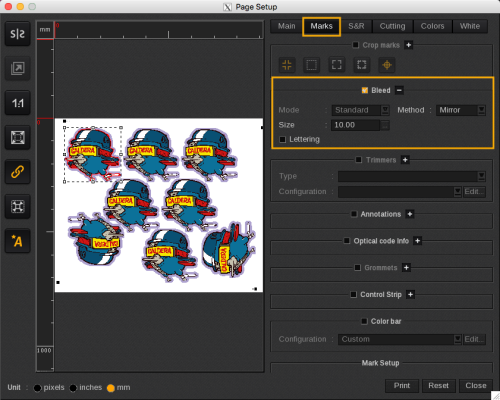
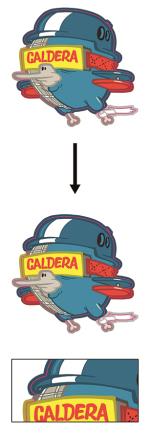
The bleed can look cut on the preview as in this example with the bird helmet; the bleed will be entirely on the print.
The ContourNestingMirror Bleeding is done using the perpendicular angle of the tops to create the symmetry. If you use rectangular forms, it will seem stretched.
Lettering
LetteringWarning: This feature requires to have properly prepared contours. The object must be created as one shape with holes. Creating separated paths as external and internal CutContours will not work properly, you can use PathFinder in Adobe Illustrator for example.
This feature is available only when ContourNesting is activated. To use it, follow the steps as described previously:
- Activate and set ContourNesting in the S&R tab.
- Activate and set PrintBleed in the Marks tab: choose the Method and the Size.
- Finally, check the Lettering feature.
- Then you can continue to set your print.