If Caldera version 13 is used check the following article:
version 13 or newer Fabrivu Dual CMYK ink set driver configuration
For older versions of Caldera continue with this article:
After loading the EFI Fabrivu driver in Caldera it still requires some configuration (This FAQ also applies to the dual CMYK Reggiani models):
1) Add the printer specific resolutions and passes:
The list of printing modes (resolutions) for the EFI FabriVu driver must be imported from a collection of printer setup files.
On the printer controller, locate the folder "print_parameters" ([Drive]:\Reggiani\print_parameters), create a ZIP archive of the contents of this folder.
Copy it to the Caldera rip.
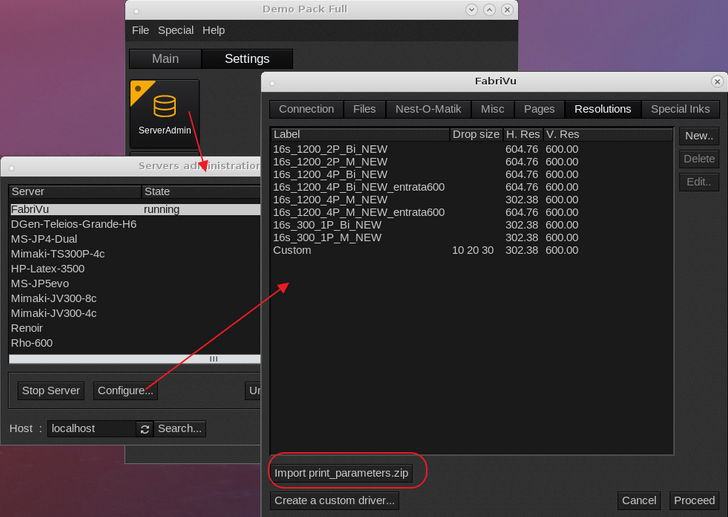
Settings Tab > Servers Admin > select the printer > Configure button > Resolutions tab > click the "import print_parameters.zip" button.
If any errors are encountered during the print_parameter.zip file check the following article on creating a complete print_parameters.zip
How to create the print_parameters.zip file
A file browser will open, allowing you to select the zipped archive > The press Proceed (password caldera) and the resolutions should appear in the printer driver.
Another option is to access the print_parameter through the network. Reggiani printers share the Reggiani folder and this folder has two subfolders:
a) jobs_to_prepare (output folder for the print/ripped files. This folder needs to be mounted as the printer driver will use this to rip the files to.
Settings Tab > Server Admin > Select the FabriVu/Reggiani > Configure > Files Tab > Base directory field.
b) print_parameters and this folder contains the printer parameter (resolutions), print_parameters_list.txt and the configuration.ini. This is the same folder which contents is to be compressed into the print_parameters.zip file.
2) In case of a dual CMYK ink set, we use a trick to avoid grainy prints. We use the first set of CMYK as normal but the second set we pretend to be a light ink set. This allows at lower densities the use of a single CMYK ink versus both CMYK inks. In higher densities both ink sets are used.
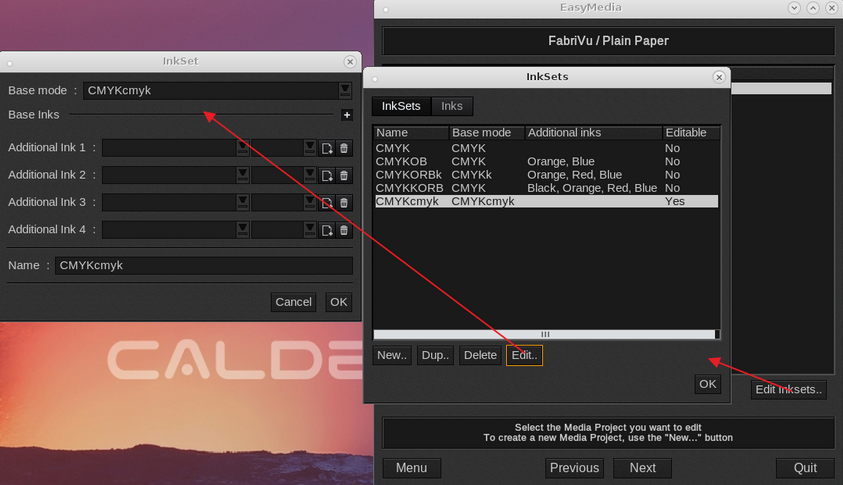
a) First create an ink set with a base mode of CMYKcmyk.
Open EasyMedia > Select the printer icon <Next> Select the Fabrivu <Next> Create a new media <Next> Select the Edit Inksets button > Then select from the drop down menu CMYKcmyk as ink set. Leave the Additional Ink 1,2,3,4 fields empty (so do not add the inks here).
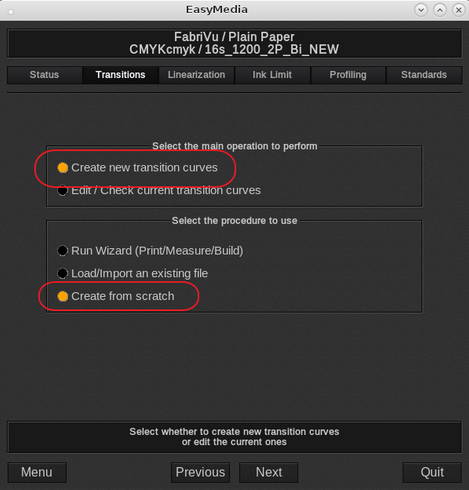
3) Now select in EasyMedia CMYKcmyk as print mode and the desired resolution. In the Transition section, create the following custom curves.
Select create new transition curves and create from scratch <Next>
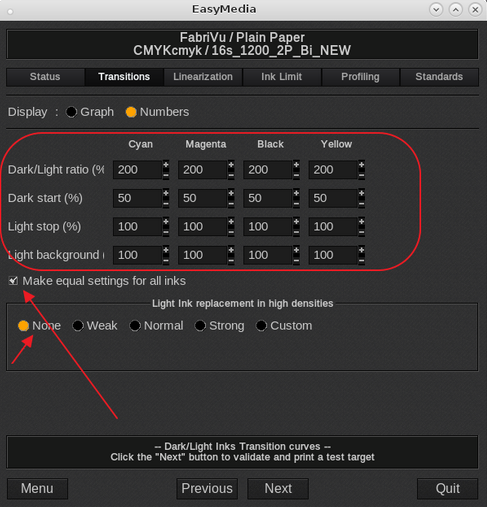
Click on the "Numbers" radio button so that the number entry menu appears:
Enter the numerical values as shown in the next screen shot. Select "Make equal settings for all inks" as this will replicate the settings you enter for Cyan to all other inks.
Be sure to check "None" algorithm at "Light Ink Replacement in High Densities":
This is the resulting curve after the numbers have been entered (click on the Graph radio button)

A single ink will be used up to 50% density and then the second ink will kick in beyond the 50%.
Keep in mind that the transition curve workaround is a good starting point but not always the best case. In some scenario's is beneficial to start the dark at a later percentage (currently set to 50%) to get smoother gradients. So double check the linearization curve.
_________________________________________________________________________________________________________
4) The last step is to set the correct ink order.
Assuming KCMYYMCK as actual printer ink order and using the transition curve trick it will look like CMYKcmyk.
Proceed to the Linearization section (only the CMYKcmyk mode will show the transition tab)
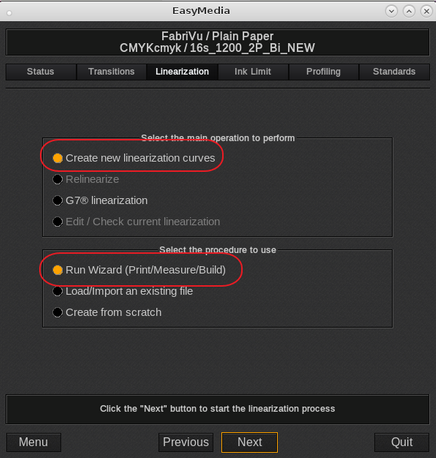
In the linearization section select, "Create new linearization curves" and "Run Wizard (Print/Measure/Build)" <Next>
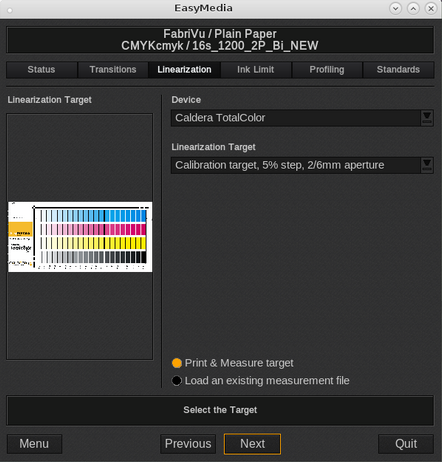
Select the Spectrophotometer and the appropriate linearization target. In this example we select the Caldera TotalColor and a target with a larger aperture <Next>
In the target print dialog we need to set the custom ink order under the Special options tab.
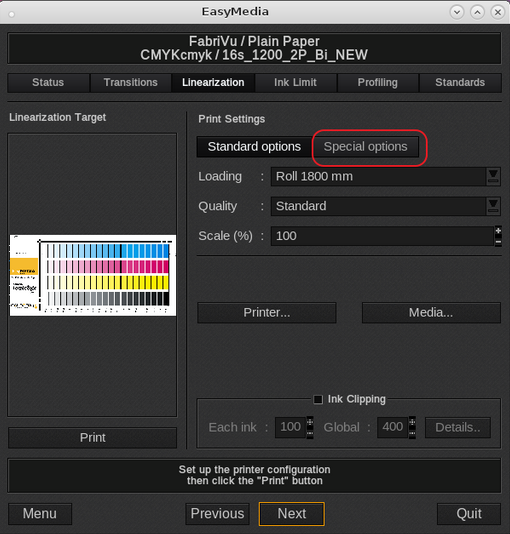
Assuming KCMYYMCK ink order or using our transition curve trick it will look like KCMYymck (lower case letters refer to the light inks):
Channel 1: Black
Channel 2: Cyan
Channel 3: Magenta
Channel 4: Yellow
Channel 5: Light Yellow (actual ink is Yellow)
Channel 6: Light Magenta (actual ink is Magenta)
Channel 7: Light Cyan (actual ink is Cyan)
Channel 8: Light Black (actual ink is Black)
Now continue to print the target. The resulting ripped files consists out of eight 1 bit TIFF files which can be loaded on the printer controller:

After printing and measuring the target continue the normal ICC profiling process per wizard.