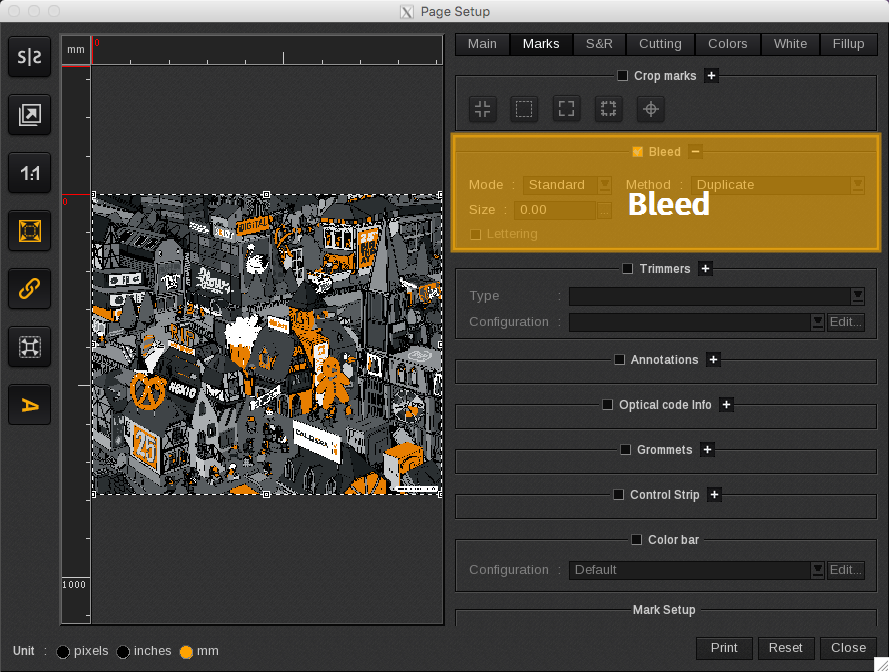
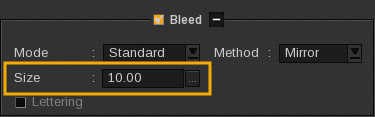
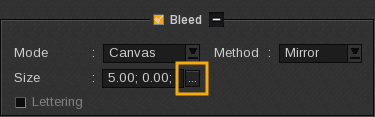
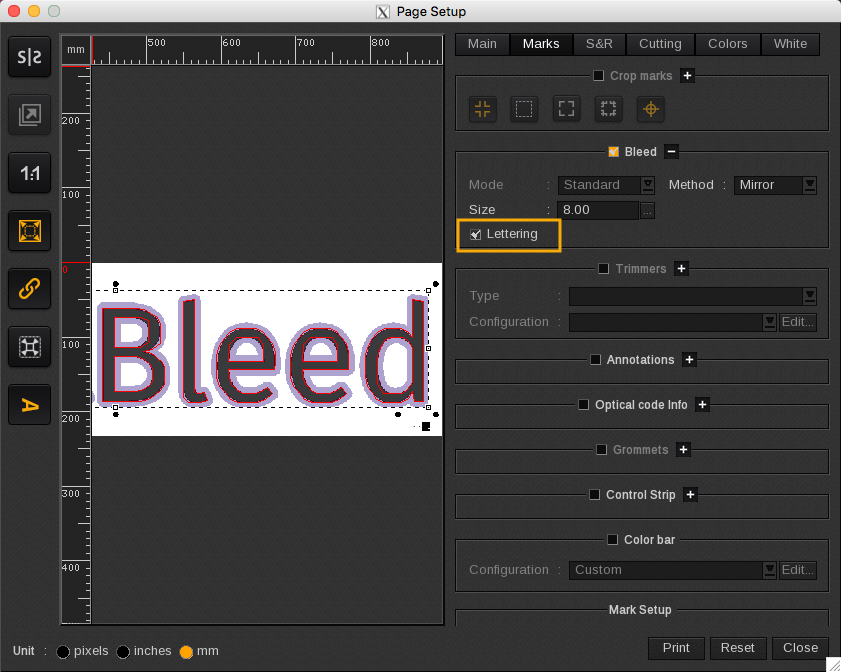
Bleed settings
-
Mode: Choose between...
- Standard: The same value of bleed will be applied on all the image sides. Bleed will be shown in color purple on the preview:
-
- Canvas: You will be able to select a different bleed value for each side. Bleed will be shown in color pink on the preview:
-
Method: Choose between...
- Mask: Only available when the bleed is used with ContourNesting.
- Duplicate.
- Mirror: For rectangular images, is done using an orthogonal symmetry. The ContourNesting Mirror Bleeding is done using the perpendicular angle of the tops to create symmetry, which means that If you use rectangular forms, they will seem "stretched".
-
Size: Accordingly to the chosen mode, the size can be set differently. The size can be 100 mm maximum (3.94 inches), or 10 mm maximum (0.39 inches) when used with ContourNesting.
- Size (customization pop-up): Enter the value of the top, bottom, left, and right sides. Put 0 if you don’t want to print bleed for a side.
- Homogeneous values: Activating this option applies the top value to all sides. If this option is activated, whatever value you change, will be applied to the other sides automatically so they keep the same value.
|
Standard bleed mode |
Canvas bleed mode |
 |
|
- Lettering: The Lettering feature is the ability to bleed internal CutContours. It is mainly used for letters (O, Q, P, A,…) but can be used for any internal contour. This feature is available only when is activated.
Caution
The Lettering feature requires to have properly prepared contours. The object must be created as one shape with holes.
In this sense, creating separate paths as external and internal CutContours will not work properly. If needed, try to use PathFinder in Adobe Illustrator for example.
- Cut around bleed (Starting from CalderaRIP V16.2). This feature allows you to automatically generate a cut contour around the bleed of the canvas:
Caution
This feature only works with the following conditions:
- The Step&Repeat tab is activated (with the Standard mode selected)
- The Cutting tab is activated (with the Add a frame contour around each image selected)
Important notes
- When the Bleed is used with ContourNesting, only the Standard Mode is available. In this sense, if you cannot choose the Mode, make sure that ContourNesting is not already activated (Go to the S&R tab, disable Step&Repeat, or change the Step&Repeat type from Contour to Standard).
- If you want to use both ContourNesting and PrintBleed, please refer to the dedicated article: How to use PrintBleed?
- If you use Step&Repeat, with PrintBleed in Standard Mode, the margin between the images will automatically be changed to twice the bleed size (if it was smaller).
- If you reduce the bleed value, the margin between your images will not be changed, you will have to adjust it directly in the S&R tab.
- When PrintBleed is used with the ExtraMarks, you must make sure you set enough margins to place your cut marks, otherwise, they will be located in the bleeding area.
- If you add other marks, indicate a Margin at least equal to your Bleed if you don’t want the elements (marks, text, date…) to be printed in the Bleeding area.
- PrintBleed will not cover the Tiling+ overlap when this one is well-defined. To properly use PrintBleed + the Tiling+ overlap: in the Tiling+ interface, you must set the overlap of the size of your bleed for internal borders and, in the Print module, activate PrintBleed so external borders will be covered too.